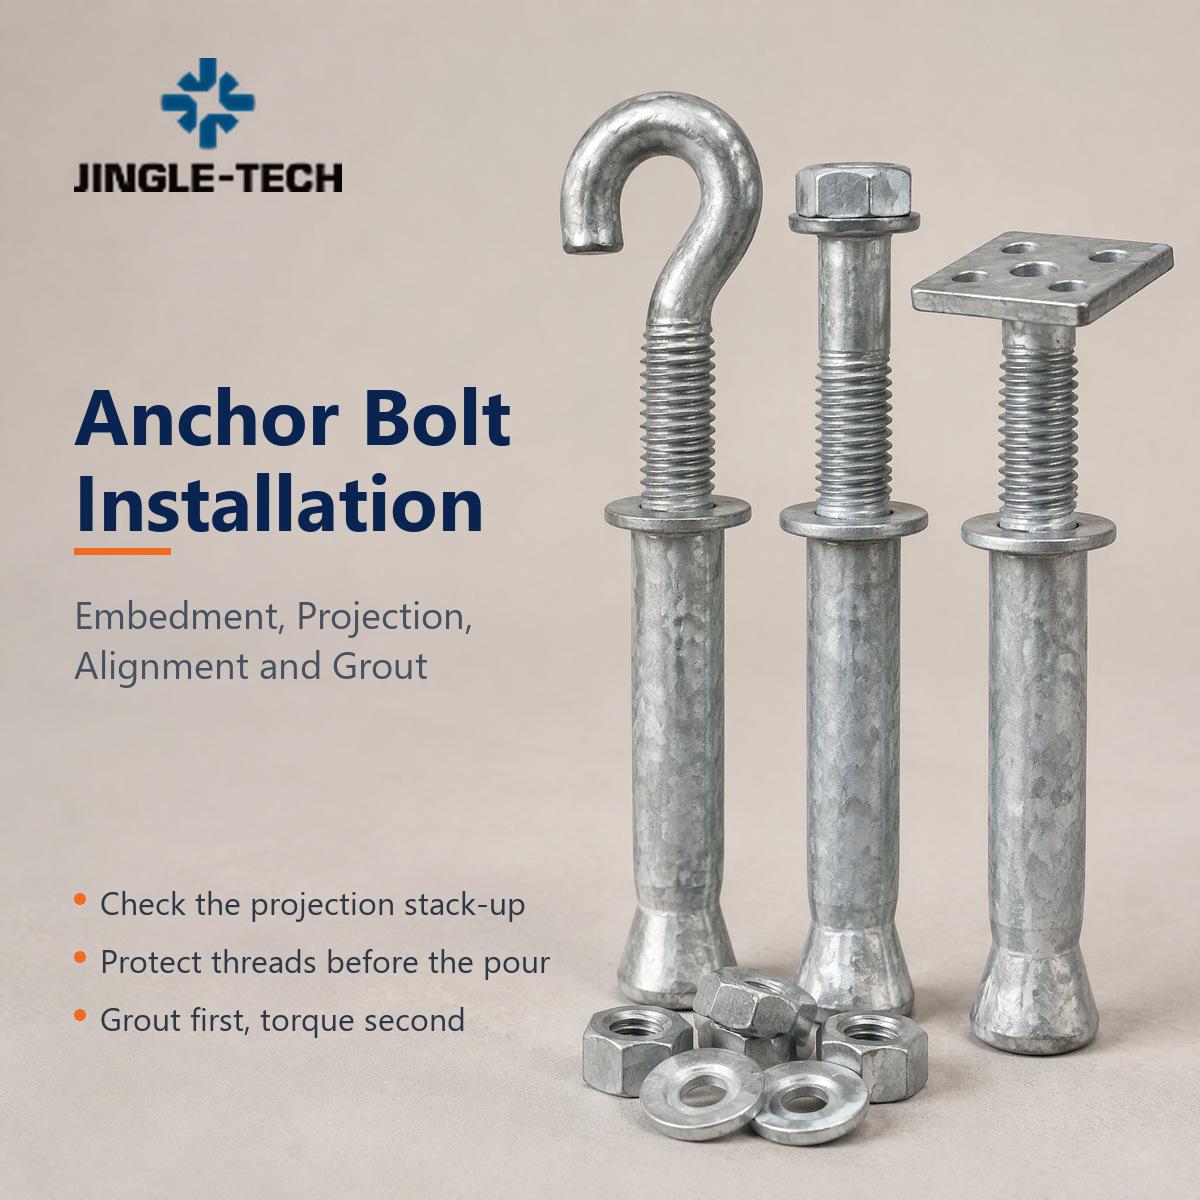
Anchor Bolt Installation: Embedment, Projection, Alignment and Grout
A base plate arrives on site with four slotted holes. The anchor bolts in the foundation are 8 mm off pattern, one of them leans, and the nuts will not start because the threads are buried below the grout line. The erection crew stops, the crane waits, and somebody starts talking about cutting the bolts off and welding new ones.
That day is almost always decided weeks earlier — in the setting template, in the projection called out on the drawing, and in whether anyone checked the anchor before the concrete went in. This guide covers the four variables that actually control anchor bolt installation: embedment, projection, alignment, and grout. It is written for buyers, engineers and site supervisors who specify cast-in anchors and need to know which details to lock down before the pour rather than after.
What anchor bolt installation actually covers
"Anchor bolt" is used for two different jobs, and mixing them up is where most specification errors start. Cast-in anchors are placed before the concrete is poured and become part of the pour. Post-installed anchors are drilled into hardened concrete and rely on expansion, adhesive or a screw thread to develop capacity.
This article is about the cast-in route: J-bolts, L-bolts, headed anchors, plate anchors, and the threaded rod assemblies that hold down columns, machinery, racking and precast panels. Post-installed anchors have their own rules and are covered separately in our guide to what an anchor bolt is and how it works.
| Decision | Cast-in anchor | Post-installed anchor |
|---|---|---|
| When it is installed | Before the pour, fixed to formwork or a template | After the concrete reaches its design strength |
| Position tolerance | Set by the template; hard to correct later | Drilled where you need it; layout is flexible |
| Failure mode to watch | Misplacement, shallow embedment, bent shank | Hole cleaning, edge distance, cracked concrete |
| Best fit | Columns, heavy machinery, precast connections, anything with a known layout | Retrofit, unknown rebar position, small MEP supports |
| Buying lead time | Must be on site before the pour — production lead time drives the schedule | Can be bought late |
The practical consequence: with cast-in anchors, procurement timing is part of the installation method. If a custom fastener manufacturer needs four weeks to produce F1554 Grade 36 anchors in a non-standard length, that four weeks sits in front of the concrete pour, not after it.
Embedment depth: the number that decides whether the anchor works or pulls out
Embedment is not a shop preference. It is a structural design output, set by the engineer of record under the anchoring provisions of the governing concrete code — ACI 318 Chapter 17 in the United States, EN 1992-4 in Europe. The anchor's tensile capacity comes from a combination of steel strength and concrete breakout cone; shorten the embedment and the concrete cone gets smaller while the steel stays the same, so the failure mode shifts from ductile steel yielding to brittle concrete breakout.
That shift is why inspectors react badly to shallow anchors. A bolt that fails by necking gives warning. A concrete cone that pops out does not.
Three practical rules we apply when reviewing drawings and producing anchors:
1. Treat the drawing embedment as fixed, not approximate. If the drawing says 400 mm, the anchor is made to 400 mm below the concrete surface, and the projection is added on top of that. The overall length on the purchase order is embedment plus projection plus the allowance consumed by the nut, washer and any shim stack. Getting this arithmetic wrong is the single most common dimensional error we correct at order review.
2. Match the anchor type to how embedment is achieved. A headed anchor develops capacity through the head bearing on concrete. A J-bolt or L-bolt develops it through the hook, which must be oriented correctly and must not sit in a thin slab where the hook can rotate out. A plate anchor spreads load over a larger area and is the usual choice when the anchor sits close to a slab edge.
3. Do not let "make it longer, it's safer" into the order. Extra embedment below a certain slab thickness puts the hook into the void, the insulation, or the compacted fill. Longer is not safer; correct is safer.
On drawings we receive from North American and European fabricators, cast-in anchors in slab-on-grade work most often land between roughly 12 and 25 times the bolt diameter of embedment, with the higher end used for tension-critical column anchors. Treat that as an observation from order history, not a design rule — the governing number is always the one on the stamped drawing.
Projection above concrete: what sticks out is where installation fails
Projection looks trivial and causes the most rework. The projection has to accommodate, in order: the grout or grout pocket depth, the base plate thickness, the washer, the nut, and enough thread left over for full nut engagement plus a visible thread run-out.
If the base plate sits on a 50 mm grout bed and the projection was calculated as if the plate sat directly on concrete, the bolts finish 50 mm short. The crew then either skips the grout, uses a thinner bed than designed, or cuts a countersink into the plate — all three of which compromise the connection.
| Component in the stack | What to add to projection | Failure if omitted |
|---|---|---|
| Grout bed / grout pocket | Full design thickness plus a little for squeeze-out | Bolts too short; crew thins the grout bed |
| Shim stack | Maximum shim height allowed by the erection plan | Not enough thread above the nut after leveling |
| Base plate | Nominal plate thickness, not the mill tolerance minimum | Short engagement on the top nut |
| Hardened washer | Washer thickness | Nut bears directly on plate; galling and loss of preload |
| Nut engagement | Full nut height plus 2–3 visible threads | Nut bottoms out on the thread run-out before reaching torque |
Two field habits protect the projection number. First, hold the projection with a rigid template that is checked against the plate drawing, not against the bolt spacing only. Second, leave the top of the anchor protected — a cloth wrap or a plastic cap over the thread costs almost nothing and prevents the concrete splatter that later has to be chased off with a wire brush, taking the galvanizing with it.
For anchors supplied as threaded rod with a separate nut and plate, projection control moves to the assembly drawing. We produce these as matched sets so the rod length, nut height and washer thickness are calculated together — see our hex nut range for the matching nuts and the tolerance class we hold.
Alignment and templates: position is decided before the concrete is placed
Once concrete sets, an anchor is where it is. There is a limited amount of correction available — slotting the plate, using a larger hole, or introducing a welded adapter — but every one of those is a concession, and some are not permitted by the connection design.
Position error comes from four places, in rough order of frequency:
Template movement during the pour. A template fixed only to the top of the formwork floats when the concrete is vibrated. Templates need to be tied to the reinforcing cage as well as the form, and checked immediately after the pour, while correction is still possible.
Bolt pattern taken from a different revision. Fabricators receive a plate drawing and an anchor plan from different packages. If the plate is slotted and the anchor plan is not, someone has to reconcile them. This is the error we catch most often at order review, and it is worth asking every supplier to confirm the pattern against both documents.
Shank bent during handling. Long anchors are springy and get lifted by the thread. A bent shank looks straight at the top and is out of position at the bottom, which quietly reduces embedment and shifts the hook.
Tolerance stack-up with the structure above. Steel erectors work to their own tolerance. If the anchor pattern sits at one edge of its tolerance and the column base at the opposite edge, the holes will not line up even though both are "in tolerance".
Two things help beyond a better template. Ask for the anchor pattern to be dimensioned from a single datum rather than chained across the plate, so tolerance does not accumulate. And specify slot direction on slotted plates — slots that run the wrong way give you adjustability in the axis that does not need it.
Grouting: the step that converts a set of bolts into a load path
Grout does three jobs: it transfers compression from the base plate into the concrete, it protects the anchor and plate underside from corrosion, and it locks the assembly once the nuts are tightened. Skip it, or place it badly, and the anchor is carrying load through a path the designer did not intend.
The sequence matters more than the material. Tightening the anchor nuts before the grout has gained strength pulls the plate down onto shims only, and the grout that follows cannot fill the gap it is supposed to fill.
| Step | Action | Check before moving on |
|---|---|---|
| 1 | Verify anchor position, projection and plumb before concrete placement | Pattern re-measured from datum; threads protected |
| 2 | Set the base plate on shims, level to the erection tolerance | Shim height recorded; not exceeding the projection allowance |
| 3 | Hand-tighten nuts to hold alignment only — do not torque | Thread engagement full; thread run-out not inside the nut |
| 4 | Form and place grout; work it from one side to avoid voids | Full bed under the plate, no dry pockets at corners |
| 5 | Cure to the grout supplier's specified strength for loading | Cure record; no crane loading on the plate before it |
| 6 | Final torque or tensioning per the connection design | Calibrated wrench or tensioner; torque and date logged |
| 7 | Touch up coating damage on anchors and plate edges | Repair material compatible with the original system |
The most common grouting defect is not a bad mix. It is a plate with no venting: grout is poured into a pocket with no way for air to escape, and the far corner stays hollow while the near corner looks perfect. Vent holes or a slight slope on the plate fix it.
Where anchors are hot-dip galvanized, remember that the nut must run the length of the thread without binding. Galvanizing adds thickness, and the standard allows the nut to be tapped oversize to accommodate it; a nut that has been over-tapped is correct, and forcing a standard nut onto a galvanized anchor strips the coating off in the thread and creates a corrosion site. Our earlier article on avoiding future problems during anchor installation covers this in more depth.
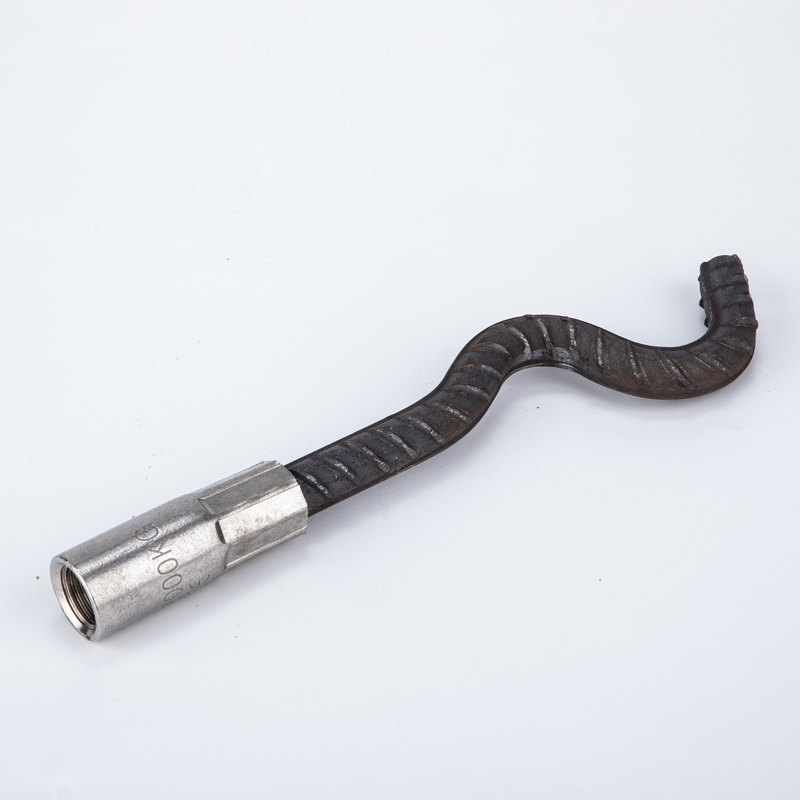
The tail is formed, not cut. The wave is what develops pull-out resistance once concrete has set around it, so the length below the surface is a design number, not a packaging detail.
Torque and tensioning: when to tighten, and when tightening is the mistake
Anchor bolt torque is often specified as a number picked from a table without reference to the connection. That number then gets applied to a bolt whose capacity, lubrication and bearing surface are different from the table's assumptions.
Three things determine what torque actually does:
What the connection needs. Some base plates are designed for tension in the anchor, some are designed to bear on grout with the anchor only holding position, and some hold a dynamic machine load where preload must exceed the working load by a margin. These are different jobs and require different target values.
What friction does to the torque. Torque is a proxy for preload, and the relationship depends on the coefficient of friction in the thread and under the nut — the subject of ISO 16047. A dry, as-received black bolt and a lubricated zinc-flake bolt of the same grade need very different torque to reach the same preload. Applying the same wrench setting to both means one is loose and the other may be over-yielded.
How the torque is measured. A calibrated wrench, a turn-of-nut method and a direct tension indicator all measure different things. If the specification says "torque to X N·m", the inspection record has to show which method was used, or the number cannot be compared with anything.
Two practical rules. First, never torque a galvanized or coated anchor with a dry, unlubricated nut and then compare the result to a value developed for plain finish — the readings are not comparable and the coating may be damaged in the process. Second, if the design allows turn-of-nut, use it: it is less sensitive to friction than torque and less dependent on the wrench's calibration history.
For structural bolting where pretension is the primary requirement, the practice converges with structural steel bolting rules under ASTM A325 and ASTM A490 for inch-series work and EN 14399 for European systems. Our article on bolt torque and clamp load works through the arithmetic that connects the two.
Field failures we see most often, and what each one tells you
These are the recurring problems that come back to us as claims or as urgent replacement orders. Each one has a signature, and the signature usually points upstream of the anchor itself.
Bolt snapped at the concrete line. Almost always bending fatigue or corrosion at the transition, not a steel strength problem. It means the plate moved relative to the anchor — loose nuts, insufficient grout, or a shim pack that was never removed from load. Check the failed face: a bright, flat fracture is tension overload; a dull, stepped face with a small final zone is fatigue.
Nuts that will not run down the thread. Concrete splatter, galvanizing build-up at the thread start, or thread damage from the template. Prevention is cheaper than cure: cap the threads, and specify chamfered thread ends so the nut starts cleanly.
Anchor pulled out with a cone of concrete attached. Shallow embedment or an anchor placed too close to an edge. Nothing about the bolt was wrong; the geometry was.
Anchor rotating in service. The J-hook or plate is sitting in a void, or the hook was oriented parallel to the edge instead of perpendicular to it. Rotating anchors lose capacity quickly and give no warning before they do.
Rust streaming from under the plate. Coating damage during erection, or a galvanized anchor paired with a plain washer. Mixed coating systems on the same connection are a reliable way to create a galvanic couple.
The useful diagnostic habit is to ask where in the sequence the defect was introduced: design, production, template, pour, erection, or service. Ninety percent of the anchor complaints we handle trace back to template and projection, which are both decided before the anchor is ever loaded.
Inspection and documentation for an export order
When anchors are bought internationally, the buyer is not standing next to the machine. Documentation is the substitute for presence, and it should be agreed before production rather than requested after shipment.
What is worth specifying, in order of usefulness:
Material certificate with heat number. For anchors under ASTM F1554, ASTM A307 or ASTM A193, the mill certificate ties the steel to the specification, and the heat number ties the finished part to the steel. Ask for the anchor's marking to be traceable to that heat.
Dimensional report. Overall length, thread length, projection, hook or head geometry, and straightness. A simple table of measured versus specified values catches the errors that cause the most site cost — length and thread length.
Thread inspection record. Go/no-go gauge results for the thread class specified. For metric anchors this follows ISO 965; for inch-series, the relevant ASME B1.1 gauging practice. Screw the gauge on before packing, not after the container is loaded.
Coating thickness and appearance. Measured coating thickness at defined points, plus a statement of the coating system and any post-coating treatment. Do not accept a salt-spray hour figure as a performance guarantee unless the test is specified alongside it — hours without a standard reference mean very little.
Marking and packing list. Grade marking on the head or the end, plus a packing list that matches the drawing revision. Revision control on the packing list prevents the "we shipped the old pattern" conversation.
One caution on certificates: a mill certificate is not a guarantee that the finished anchor meets the specification. Heading, bending and thread rolling all change the part. If the application is tension-critical, ask for mechanical properties from the finished product, not only from the incoming bar.
Material, grade and coating: matching the anchor to the exposure
Grade selection for cast-in anchors usually starts from a standard rather than from a strength number. In North America, ASTM F1554 covers anchor bolts in three grades — 36, 55 and 105 — and the grade number refers to minimum yield strength in ksi. ASTM A307 covers the lower-strength general-purpose anchors used for light column bases and equipment. Higher-tensile anchors for structural column connections are frequently specified to ASTM A193 B7 where the design calls for it, or to ASTM A449 depending on the specification package.
Where metric systems apply, property classes follow ISO 898-1, and anchor grades are commonly specified as 4.6, 5.6 or 8.8 with the higher classes reserved for cases where the connection really needs them. Higher grade is not free: 8.8 and above are more sensitive to hydrogen embrittlement after plating, and the process controls — baking after electroplating in particular — become part of the specification.
| Exposure | Typical choice | What to watch |
|---|---|---|
| Interior, dry, protected | Plain finish, light oil | Oil film is temporary; specify if appearance matters |
| Exterior, sheltered | Zinc plating or zinc flake coating | Thread must remain gaugable after coating |
| Exterior, wet, coastal | Hot-dip galvanized to ASTM A153 / ISO 10684, or stainless | Oversize tapping; drainage at the low point |
| Buried or in contact with soil | Heavier galvanizing or stainless depending on soil chemistry | Coating damage below grade is invisible and unrecoverable |
| High-strength, plated | Grade 8.8 / 10.9 / A490 with zinc flake or mechanical zinc | Hydrogen embrittlement — require baking after plating and a process record |
Stainless is not automatically the right answer for anchors. Austenitic grades in the A2 and A4 families are common, but in chloride-bearing environments and where the anchor is under sustained tensile load, stress corrosion cracking becomes a real risk, and the higher-strength cold-worked grades are more susceptible than the annealed ones. If the exposure is severe, the material decision belongs with the engineer, not with the purchasing team choosing the cheapest upgrade.
For precast applications the anchor is often a precast concrete machining parts manufacturer question as much as a fastener question — the anchor, the recess former, the lifting loop and the connection insert all have to work as one system, and buying them from three suppliers is where tolerance stack-up gets out of hand. Our guide to J-type anchor bolts covers the hook geometry in more detail, and if the connection is a cast-in channel or coil insert, the selection logic differs enough to be worth a separate read.
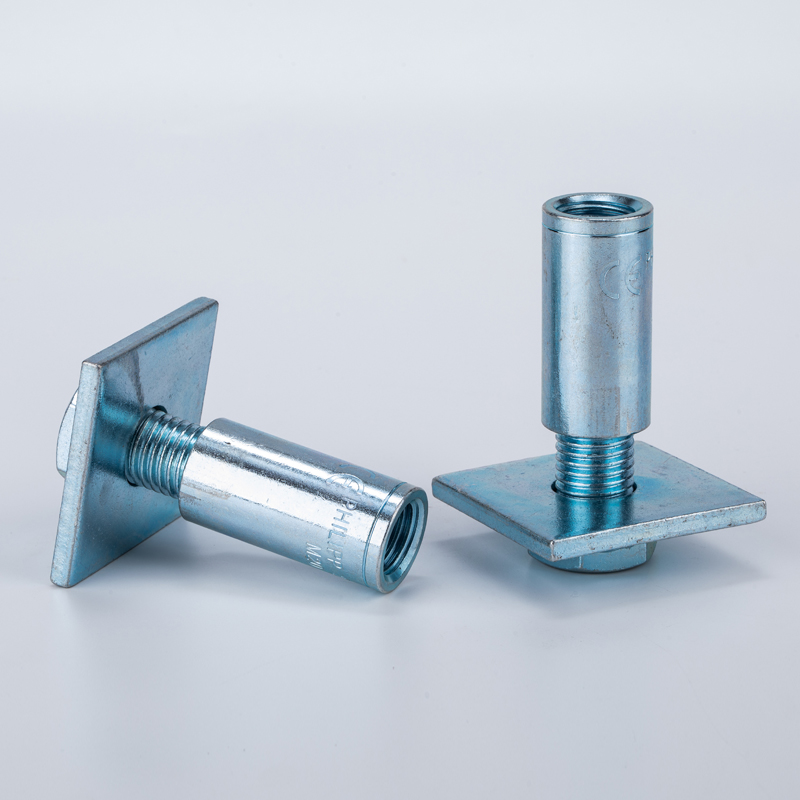
Anchor, plate and thread in one part. When the plate is welded and the thread is formed by the same supplier, the projection arithmetic has one tolerance to defend instead of three.
When the anchor is bought after the concrete is already poured
Retrofit work follows the same four variables but in a different order. Embedment is now limited by slab thickness and by whatever rebar sits in the drill path, and alignment is limited by the existing structure rather than by a template. The anchor choice shifts to post-installed systems, and the supplier question shifts with it.
Three practical differences matter when specifying at that stage:
Hole cleaning is the whole installation. In a cast-in anchor the concrete bonds to the steel because it was poured around it. In an adhesive anchor, the bond is only as good as the hole — dust, moisture and hole diameter decide the capacity. If the specification names an adhesive anchor but the site has no brush-and-blow procedure, the design assumption is not being met.
Edge distance and spacing govern, not bolt diameter. A post-installed anchor close to a free edge will fail in concrete before it fails in steel. Reducing the bolt size to "fit the space" often moves the failure mode in the wrong direction, and the fix is usually a different anchor geometry rather than a smaller one.
Cracked concrete changes the selection. Many locations in a real slab are cracked or will crack in service, and not every post-installed product is qualified for that condition. A concrete anchor manufacturer product approved only for uncracked concrete should not be substituted for one approved for cracked concrete to save cost — the two look identical on the invoice.
For buyers running a mix of new-build and retrofit, the sensible split is to standardise the cast-in anchors on one specification and treat the post-installed range as a separate, smaller list that site can actually manage. Trying to hold one anchor type across both applications usually means compromising one of them.
Where this leaves the specification
Four numbers and one document decide whether an anchor installation goes smoothly: embedment, projection, pattern, and torque target — held together by a drawing revision that everyone is working from.
The anchor itself is the easy part. As an OEM fastener and machined parts supplier working with a custom fastener manufacturer network in Ningbo, we can hold the dimensional and material side of that with a third-party assessed supplier profile showing 12 years of export experience — but we cannot fix a plate drawing that disagrees with an anchor plan, and neither can any other supplier. That review has to happen before the order is released.
What we can do is check every order against the drawing before production, flag the projection stack-up questions, and supply the documentation package that lets the buyer's inspector sign off without flying to the factory. If your current supply chain treats anchors as catalogue items, the review is where the rework gets caught.
Where the rest of the assembly comes from
An anchor is rarely bought alone. The same connection usually needs nuts and washers of a matching class, and the same project usually has a dozen other fastening points that were specified by the same person on the same afternoon. Buying those from one source is not about loyalty; it is about the tolerance and coating questions being answered once instead of three times.
Three patterns show up repeatedly in export orders:
The nut and the anchor come from different supply chains. A galvanized anchor with a plain nut, or a class 8 nut on a class 4.6 anchor, is a connection where one component sets the capacity and the other sets the failure point. When the anchor, the custom nut manufacturer-grade nut and the hardened washer are sourced together, the property class, thread class and coating are matched by construction rather than by inspection.
The drawing mixes fastener families. A column base plate may specify a high-strength structural bolt manufacturer product for the splice and a lower-grade anchor for the foundation, and both appear on the same sheet. Keeping the grade marking distinct — so that an 8.8 bolt cannot be installed where a 4.6 was specified — is a marking and packing discipline, not a metallurgy problem.
The small parts decide the schedule. Self-drilling and self-tapping screws for the cladding, hose clamps for the services, lifting anchors for the precast panels: none of these are the expensive line item, and all of them can stop a site. A contractor who has to chase a box of custom screw manufacturer-grade fasteners in the right length loses more than the parts cost.
For services and pipework the same logic applies to clamping. A hose clamp manufacturer decision looks trivial until the clamp is the wrong band width for the hose and the joint weeps under pressure — the failure is in the selection, not the clamp. Where the clamp carries a load rather than a seal, the requirement changes again.
Precast is where the assembly question is most visible. A panel needs a lifting anchor manufacturer product that matches the clutch, a recess former that matches the anchor head, and a connection insert that matches the cast-in channel. Buy those from three suppliers and the tolerances are independent; buy them as a system and the tolerances are checked against each other before anything is cast.
What to put on the drawing: a one-page installation specification
Most anchor disputes could be avoided by one page attached to the purchase order. It does not need to restate the structural design. It needs to remove ambiguity on the six points where suppliers and site teams make different assumptions.
1. Anchor type and standard. J-bolt, L-bolt, headed, plate anchor or threaded rod assembly, plus the governing standard — for example ASTM F1554 Grade 36, or ISO 898-1 class 4.6 for a metric equivalent.
2. Dimensions, separated. Overall length, embedment, projection and thread length as four separate numbers. A single overall length with the projection "to be confirmed on site" is how the wrong anchors get made.
3. Thread specification. Diameter, pitch and class — for example M20 × 2.5, class 6g, or 3/4-10 UNC 2A. Include the thread length and whether it is rolled or cut.
4. Coating system and its effect on the thread. Coating type, nominal thickness, and the requirement that the nut runs the full thread after coating. If galvanized, state that nuts are tapped to suit.
5. Marking and traceability. What is stamped on the part, and which certificate accompanies the shipment. If the grade cannot be read on site, the marking has failed regardless of what the certificate says.
6. Documentation set. Mill certificate with heat number, dimensional report, thread gauge record, coating thickness record, and the packing list keyed to the drawing revision.
On the buying side, that page is also the fastest way to compare quotations. Two suppliers quoting different anchor types, different thread classes or different coating thicknesses are not comparable on price, and the difference usually only surfaces when a shipment is rejected. Ningbo Jingle-Tech Imp. & Exp. Co., Ltd. works from Room 1401, Huacheng International, Yinzhou District, Ningbo, Zhejiang, China, and reviews every anchor order against the drawing before release for exactly this reason — the review is cheaper than the correction.
Questions buyers actually ask
How much thread should be left above the nut?
Enough for full nut engagement plus two to three visible threads, and no more than about one bolt diameter beyond that. Excess thread is exposed corrosion surface and a handling hazard; thread that runs short leaves the nut unable to reach its torque without bottoming on the run-out. Ask for the projection to be calculated from the grout bed, plate, washer and nut stack, and confirm the total on the drawing rather than on the purchase order alone.
Can I shorten an anchor on site if the projection is too long?
Cutting is possible on plain-finish anchors, but it removes the chamfer that lets the nut start, and on galvanized anchors it removes the coating from the cut face, which then needs a repair system that is rarely applied correctly. On high-strength anchors, cutting is a change to a certified part and should be approved by the engineer. The cleaner answer is to get the length right at the factory — which is why we confirm the stack-up before production.
What is a normal lead time for custom anchor bolts?
It depends on grade, coating and whether the steel is a standard section. Plain and zinc-plated anchors in common diameters are typically a matter of weeks; hot-dip galvanizing and stainless add a process step, and non-standard lengths or heads usually require a dedicated setup. Because anchors must be on site before the pour, the lead time has to be planned backwards from the concrete schedule, not from the steel erection schedule.
Do I need a mill certificate for every shipment?
For structural and tension-critical anchors, yes — and it should carry the heat number so the finished part can be traced to it. For general-purpose anchors in non-structural applications, a certificate of conformity may be enough, but agree that in writing before the order. The cost of certificates is trivial compared with the cost of pulling anchors out of a foundation because the grade cannot be demonstrated.
How tight should anchor nuts be?
Follow the connection design, and if the design gives no value, ask for one rather than substituting a table. Torque depends on the friction in the thread and under the nut, which changes with coating and lubrication, so a number copied from a chart for a different finish is not transferable. Record the value, the method and the date — an inspection record without the method cannot be compared with anything.
Why do my galvanized nuts bind on the anchor?
Hot-dip galvanizing adds a zinc layer that the standard anticipates by allowing oversize tapping of the nut. If a standard-tolerance nut is supplied with a galvanized anchor, it will either not run or will strip coating from the thread. Specify that nuts are tapped to suit the galvanized thread, and check a sample by running the nut the full length before accepting the shipment.
What tolerance should I put on the anchor pattern?
Put it on the drawing explicitly, and dimension from a single datum rather than chaining dimensions across the plate. Whatever the tolerance, confirm the plate hole size and slot direction can absorb it — if the connection is designed with slotted holes in one axis only, the anchor tolerance in the other axis has to be tighter. Suppliers can hold a pattern precisely; the risk is that the drawing never said what precision was needed.
Can you supply anchors with the plate and nuts as a matched set?
Yes, and for export orders it is usually the better option. Supplying the anchor, nut, washer and plate as one set means the projection arithmetic, the thread class and the coating system are consistent, and the tolerances are checked against each other rather than independently. It also puts the coating compatibility question with one supplier instead of three.
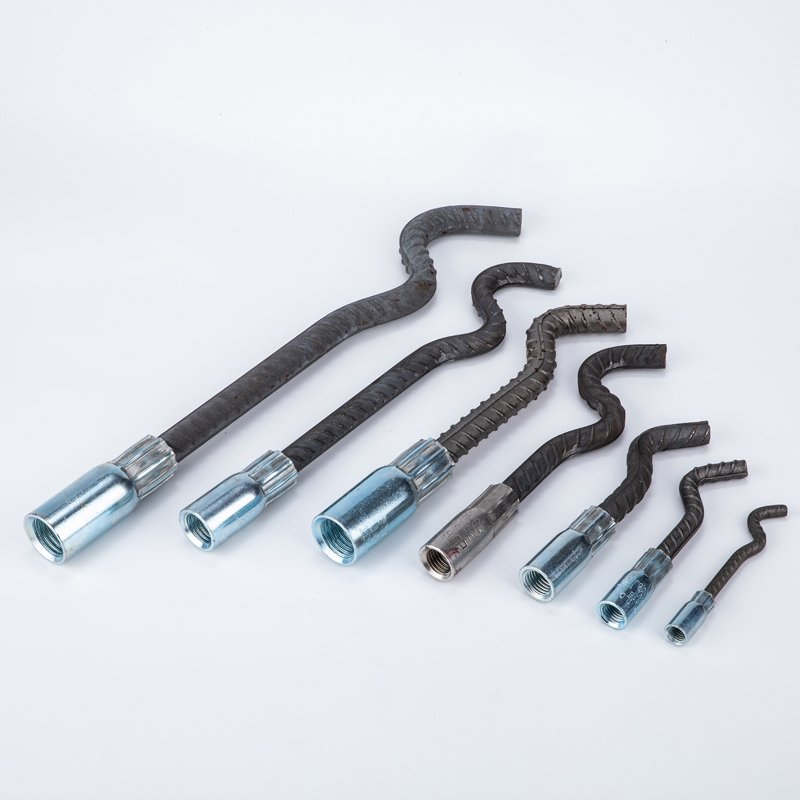
One anchor family, seven diameters. Coating system and thread class have to hold as the size changes, because a single pour usually mixes two or three of them.
Get a quotation you can actually compare
Send your drawing, quantity and destination market. We reply with material, grade, coating options and the evidence we can provide for that specific part.
Send Your Inquiry Now →Or email sales@jinglefix.com · WhatsApp +86 13958236696